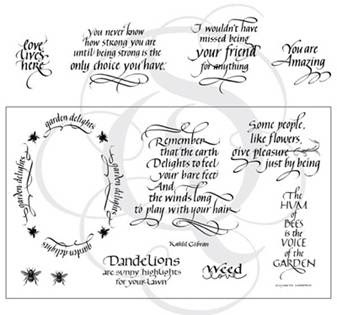
Welcome to the Quietfire Design Garden Delights Blog Buzz! Quietfire Design would like to introduce you to their new Spring selection of rubber stamps! Each day designers will be posting brand new artwork they have created using the new rubber stamps. Visit each of their blogs on the day of their featured project, post a comment on their Blog Hop post and you will be eligible to win a grab bag of Quietfire Design rubber stamps valued at $50! Each Designer will randomly choose a winner from the comments on their own Blog Hop post, so make sure you’ve commented by midnight Friday, May 18th. Tell your friends!
The complete set of new rubber stamps will remain on special at 20% off throughout the Blog Buzz!
All winners will be posted on the Quietfire Style blog on Sunday May 20th. If you are one of our lucky winners, please contact Suzanne privately with your snail mail address. (Her email address is in the sidebar of the Quietfire Style blog)
Here is our schedule:
Monday, May 14th:
Yogi,
Holly
Tuesday, May 15th:
Robyn,
Dawn
Wednesday, May 16th:
Wanda,
Sherry
Thursday, May 17th: Monica (you are here),
Terre
Friday, May 18th:
Suzanne
Now, on to my project...
I've just recently succumbed to the lure of Distress Inks and have belatedly taken the Tim Holtz Creative Chemistry 101 online class. I have started altering some unnecessary pages in a garden journal using some of the techniques learned in this class and featuring the new Garden Delights stamps from Quietfire Design.
Create backgound using several colors of
Distress Inks,
Ink Blending Tools and Spritz and Flick Technique. As I wanted to allow the picture in the lower left corner to show, I created two pieces of background papers. Cut and emboss lower edge of both pieces with
Spellbinders Classic Petal, and one of the
Classic Decorative INSERTS Three. Cut a strip of paper and ink with Mustard Seed DI; tape behind cut edge on both backgrounds. Ink edges of journal page with Peeled Paint DI and attach background with
double-sided tape. Print clip art of bee skep on cardstock and color with Prismacolor pencils. Tear edges and ink with Wild Honey DI and attach to page. Stamp The
Hum of Bees on another piece of background with
Archival Jet Black ink. Cut out using
Spellbinders Lattice Rectangles. Attach to page with pop dots. Stamp bees with Archival ink and use a gel pen to create trails behind bees. Rub a very scant amount of Worn Lipstick around spots of the edges of the page to warm up the Peeled Paint.
Create 4 pieces of background paper with several colors of
Distress Inks. Run each piece through a different Cuttlebug Embossing Folder. Use waterbrush and either DI reinkers or a bit of DI ink pressed onto
craft sheet to highlight certain embossed elements. Tear edges and ink with Wild Honey DI and glue together. Ink edges of page with Peeled Paint DI and attach embossed backgrounds. Create a background using yellow, orange and red DI. Stamp
Garden Delights oval and Love Lives Here using Archival ink. Cut out with
Spellbinders Label 5 and attach to page.
Using one of the small elements from the
Spellbinders Fleur de Lis Pendants to cut out five petals from a strip of paper inked with Mustard Seed DI. Stamp large bee on scrap inked with Spiced Marmalade DI. Tear out, inking edges. Assemble with craft glue to form a flower and attach to upper corner of page with a pop dot.
Create background using the Perfect Distress Mist Technique (Worn Lipstick, Spicy Marmalade and Mustard Seed). Do another piece using only Worn Lipstick. Make a wash of craft glue and water; use a waterbrush and add a spray of pressed flowers to large background. Use glue wash to adhere a piece of lace. After the glue dries past the tacky stage, press down on the flowers and lace with the back of a woodmounted stamp or other hard surface to get good contact with the paper. Repeat a couple times during the drying process. Stamp
Remember saying on smaller background and cut out with
Spellbinders Fleur de Lis Rectangle. Ink edges with Worn Lipstick. Attach with double-sided tape. Stamp portions of
small flourish along bottom with Peeled Paint DI. Ink portion of Tim Holtz wire background and stamp across upper corner. I think this stamp looks like bees’ honeycombs. Stamp small bees across top. I just love this little bee! This page was hard to photograph due to the Perfect Pearls. The picture doesn’t due it justice.
Thanks for stopping by to view my creations. Don’t forget to visit all the other blogs in this hop (schedule above). The blog buzz started Monday and continues through tomorrow. You have until midnight tomorrow night, Pacific time, to comment on all of the participating blogs for chances to win prizes. Happy Buzzing and good luck!!
Hugs,


